Hey all! I'm back from a three day weekend of hanging out with friends
down at a con! I got to paint six sets of nails, including my own and
four guys! Two of them were just shaping the nail and a clear coat, but I
know they enjoyed it! Right before my trip I picked up a fantastic Sally
Hansen bundle I found tucked away in our clearance section! three pack
of the Salon Manicure collection, three bottles for only $9.99! Well I
got my discount, plus a store coupon PLUS a coupon I had for Sally
Hansen. I walked away with the chic collection for a wallet friendly
$6.09.
I got top and base coat
a gold copper and ruby red polish
none of them had names on the bottles
So I wanted to try a technique I saw on another nail bog http://www.makeupwithdrawal.com/2012/03/tutorial-sprinkled-nails.html
So I followed her directions. I used some of my very old loose eye powders that I never use but keep around for a love of bright eye colors still. The concept is to paint your nails and drop loose powder while the polish is still wet, let it set a bit and wash the excess off with water and hit it with a top coat after.
So I started to do this with a deep blue, and well I didn't like how un-dramatic it came out. So I took the dark blue polish and tried it with a lighter blue.
Well it came out super dull against the pastel teal/blue. So I started getting impatient with this technique and just gabe up on it for the time being. I will try this technique one more time, but like many tries in the past with new techniques I just couldn't achieve the look I wanted .
Photos from the dark blue attempt
got a bit messy
Light blue attempt
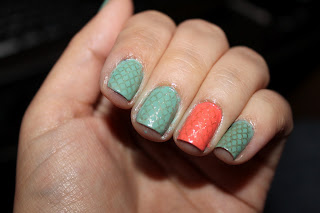
So after this I just painted my nails a nice pastel teal and salmon-ish orange color. Well I wanted to vamp them up a little bit. I wasn't feeling glitter, so I decided to finally use my nail stamping kit! Now I bought the super cheap Salon Express nail stamping kit, and went out and got M.A.S.H. and Red Angel plates too.
To liven the nails up I added a gold kinda fence design. Now this was the first time I stamped all of my nails, and after I got into a rhythm that worked for me it went by quickly! I used a Sally Hansen Xtreme wear polish. From other reviews I've read/watched the thicker the polish the better the stamp. The polish needs to have a good pigment formula too. I've heard the Insta-dri line works wonderfully as well, plus any polish that says one coat polish.
I was happy the way it came out, it added a different type of texture to my nails and made the look unique. I hope to use my stamping plates more often with my nail designs.
Oh and one last thing, I have some cell phone photos of the nails I did this weekend. Don't mind the lack of good color/details. I took the photos with my cell phone and didn't have my DSLR with me =(
For my friend, the fellow bacon lover...bacon and eggs
I was in Mets area (NY baseball team) and after buying some Mets tees I wanted to rock a little team spirit. So I altered the team colors blue and orange with a matte finish.
I switched up the colors on my left and right hand. I am very excited to go to my first Mets game this Friday!
These are one of the guys that got his nails done. He came in with silver polish, and left with a playful rainbow polish look. He said it came out better than any other time he's tried to paint his nails. I gave him a few painting tips.
and much thanks goes to my fiance, he finally let me paint his nails! Silver and gold polish!
Thanks for reading my blog. Don't forget to keep in touch on my facebook page for the blog


The bacon and egg nails are exceptionally awesome. Keep the blogs coming! :)
ReplyDeletewhy thank you my dear! I will keep em' coming :)
ReplyDelete